Category Archives: Garden & Animals

Fall Garden 2019

Fall is here and it is the best season of the year IMHO.  Time to harvest and close down the garden.

Cucumber is my favorite summer veggie.  I was able to harvest continually about 4x 5 gallon-bucket of fresh cukes.
This is the oldest apple tree on our farm.  I suspect it is over 30 years old.

In previous years, the apples had blight, scab and were usually sour.  We could use may be 10% of the harvest.

However, this year we have a bumper crop and the apples are sweet and crisp, without much blemish.

I did NOT do anything this year to this old tree so I am feeling overwhelmed.

Drying garlic for storage and planting in October.
This is fall lettuce.
This is a new 3″ x 8″ square where I will be planting garlic.
3 plants of spaghetti squash produce 18 fruits.

Midsummer Garden 2019

So far we have a pretty good summer.  There were a couple of hot humid days but overall it is pretty good.  I have expanded the garden again this year by using solely  chicken manure plus wood shavings from cleaning the chicken coop.  Once again, the plants grow substantially better in the compost.

Pristine apple that I planted when we first moved the hobby farm.  It has been bearing more fruits in recent years.

I am also using a yellow sticky sheet to trap bugs and I have been spraying kaolin clay/water mix to protect the tree.

Corn, garlic and cucumber cramp into a small space but growing well in chicken compost.
White bitter melon.  This is the first time I have ever seen or planted such a variety.
Squash and cucumber (on trellis) growing together.
Spaghetti squash.
Carrot (front) and providence green beans (back).
Grapes.

Rat in Chicken Coop

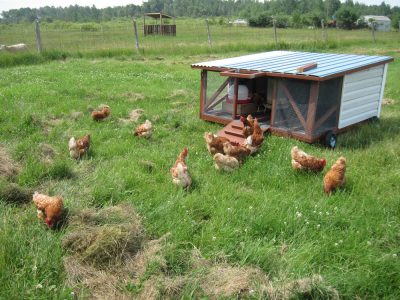
We have been raising layers for more than 10 years and we noticed  holes being chewed out of the chicken coop floor starting last fall.  I noticed that “tunnels” were being dug  beneath the floor.  Upon further investigation, I found out the chicken coop has no concrete foundation and is sitting on wood beams, but the floor is insulated with 2″ thick foam board with plywood on top.

Being inexperienced with rats, I simply patched the hole with concrete, hoping that would stop the invasion.  Well, new holes would pop up every other day randomly, even on walls (plastic board).  Initially I thought the unwelcome guests were moles or voles, but after research on the internet, I finally realized that the nightmare was brought about by rats.  You see, moles love to dig tunnels, but they do not eat grains; they eat earthworms and grubs.  Voles are rodents but they mostly eat plants.  Rats, on the other hand, eat anything and are notorious for chewing holes through thick wood.

The rats are attracted by the chickens because  seeds and feed would fall around the feeder during pecking and when food is scarce in winter, the warm chicken coop is a perfect habitat.

Arming with the discovery of the real enemies, I purchased a rat “high power kill” trap and baited it with peanut butter.  Sure enough, the trap was triggered but was pulled all the way to the hole.  Next, I screwed the trap to the floor but again the peanut butter was gone with no sign of rats (trap triggered).

I then purchased a rat bait station but the rats were not attracted by the bait.  Later I found out that the hole was too small for the rat to enter!

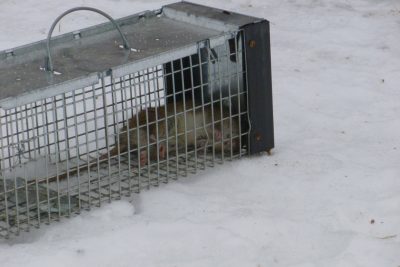
Finally I decided to try the Havahart® X-Small 1-Door Trap.  I had success with this trap for catching squirrels.  Sure enough, after a few nights, I finally caught the bugger!  It was a big grey Norway rat!

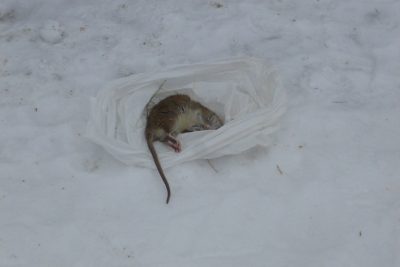
But….that was not the end of story.  I ended up buying the traditional wooden snap trap as well so I continued to set the snap trap, live trap and bait station.  Subsequently, I found out the snap traps were only effective against baby rats.  The adult rats could wriggle away after being snapped!  The live trap was the only effective way.

We ended up killing 4 big rats and 2 small ones.

But….that was also not the end of story.  After a few days, there were still signs of rats.  What in the world!?  By this time I have 2 live traps but this rat never visited them, yet it started to chew holes everywhere again.

Finally, I decided to take the rat bait from the bait station and dropped it through the hole in the wall and then sealed the holes up with spray foam.

Now after 3 days, no signs of rats yet…..but I won’t be able to tell until at least a week is past.  Unfortunately, here in Ontario only licensed personnel can purchase rat poison without bait station and in my situation, the rat bait was the last resort.

Coming spring, I would have to dig around the coop and seal the holes.  I would also lay down a layer of hardware cloth on the floor and put new floor on top.  Lots to do on a farm.

Garden Progress Summer 2018

It has been a hot summer this year. Several occasions of above 40°C weather. There was even a “camp fire ban” issued by the fire department in our township. Thankfully, thunderstorms arrive and relieve the mini “drought” for our garden. Plants start to grow rapidly.

​

This is a ROUND zucchini!  An heirloom variety.
This is a normal green zucchini but somehow grows like a staircase!?
Very early apple crop.  Almost every apple has blemish and some are rotten.  I still have a long way to grow the perfect organic apple.
Potatoes:  Alta Blush, German Butterball and Purple Viking.
  Green cabbage, yellow zucchini and cucumber.
  Daikon (big white radish)
  Purple peacock pole beans.


Chicken Tractor In Action

As you saw in my previous blog Building New Chicken Tractor, I have now put the chicken tractor into action.  15 layers are now “officially” producing free-range pasture-raised eggs.  Since I used metal panel as roof, the tractor is heavier than I have thought, but the 4-wheel design does help.

Most layers are using the roll-out nest box but a couple of them like to sneak under the coop and lay eggs on the pasture.  When we move the coop everyday, we always have the surprise to see 1 or 2 eggs in the grass.

Scratching the earth, nibbling the grass and chasing bugs.  Happy chickens!
Chicken manure is great for the pasture.
Eggs rolling out in the nest box.
Fresh egg is the best.


Building New Chicken Tractor

This month I have been busy building a new mobile chicken tractor to be used on the pasture.  I have always wanted to have a mobile tractor for layers but things are hectic at times with 8 children and a full time job.  The old mobile tractor for the meat birds have been partially damaged over the years and I intend to build a smaller and shorter tractor this time.

Searching over the internet there are hundreds of chicken tractor design but I end up using Justin Rhode’s Chickshaw plan.  I made some modification to his plan to suit my needs but over it was a very good starter plan.

For large-scale egg business readers, check out Mobile Chicken House

Orchard 2018

I have planted 4 apple trees and 2 pear trees since we moved to our hobby farm 11 years ago.  Over the years, only 2 of the original trees survived and I have been replacing them with trees I purchased from Canadian Tire or Home Depot.

I found that it is better to pay more ($20 more) for an older tree (4 years old vs yearling).  If you start with a yearling, you could wait up to 8 years for it to start bearing fruit!!  Too long!

Since we have sheep, I have been piling the sheep manure in between the trees to cover the grass and weeds.  I am sure the trees would benefit from the sheep manure compost and guess what, 5 of the trees are flowering this spring.  In addition, I am attempting to apply some good orchard management practice:

  • Spray the trees with organic garlic oil/water mix before blossom and through the season
  • Apply insect barrier along the tree trunk, i.e. Tanglefoot
  • Handpick and kill caterpillars as soon as I find them
  • Proper pruning every year
   4 apple trees and 2 pear trees.  One of the pear trees is the new “4-in-1” pear tree which supposed to give 4 different kind of pears in 1 tree.
   This is the original apple tree that I planted 11 years ago as a yearling.  It started to bear fruit 2 years ago.
   Insect barrier along the trunk to trap ants, caterpillars, flies, etc…
   This is the brand that I used.  Very sticky!


Garden Progress 2017 – Part 2

I have been adding chicken litter every year to the garden patch that uses conventional row growing method (as compared to Square Foot Gardening ).  Every after year I can notice good results from the chicken compost.  This year I am growing cucumber, zucchini and squash.

This is the garden patch.  I built some trellis this year using bamboo sticks.
Cucumbers growing along the bamboo trellis.
Butternut squash forming.
The boys are good helpers in the garden, surprisingly.  They have helped me harvest all those produce.
Cucumbers, potatoes (grown by themselves from those potatoes that we missed last year), yellow zucchini

Garden Progress 2017

As we step into summer, we can finally harvest something out of our garden: peas and salad. Each of our children (except Caleb) gets his/her own square this year. I believe it is a great idea to train our children to grow food themselves. Not only can they learn to work with their hands, they would learn to appreciate the blessings from God and the hard work of farmers.

IMG_7459 When the garlic leaves started to turn yellow and die, it is time to dig up the bulbs.
IMG_7458 If rain is not expected for a couple of days, you can simply leave the whole plant on the soil to dry.
IMG_7457 1 square can provide up to 64 garlic bulbs.

Mid-Summer Garden 2016